比如像启动Tomcat这种,
前提是需要有jdk环境,所以配置自启动这类型的命令时必须要将其前置条件放在启动命令之前,例如:
1 | # 编辑vim /etc/rc.local,配置如下: |
ubuntu 18.04.1
ubuntu18.04不再使用initd管理系统,改用systemd。个人觉得systemd很难用,改变太大,跟之前的完全不同
为了像以前一样,在/etc/rc.local中设置开机启动程序,需要以下几步:
systemd默认读取/etc/systemd/system下的配置文件,该目录下的文件会链接/lib/systemd/system/下的文件。一般系统安装完/lib/systemd/system/下会有rc-local.service文件,即我们需要的配置文件。
链接过来:
1
ln -fs /lib/systemd/system/rc-local.service /etc/systemd/system/rc-local.service
打开脚本内容:
1
cat /etc/systemd/system/rc-local.service
1
2
3
4
5
6
7
8
9
10
11
12
13
14
15
16
17
18
19
20
21
22
23# SPDX-License-Identifier: LGPL-2.1+
#
# This file is part of systemd.
#
# systemd is free software; you can redistribute it and/or modify it
# under the terms of the GNU Lesser General Public License as published by
# the Free Software Foundation; either version 2.1 of the License, or
# (at your option) any later version.
# This unit gets pulled automatically into multi-user.target by
# systemd-rc-local-generator if /etc/rc.local is executable.
[Unit]
Description=/etc/rc.local Compatibility
Documentation=man:systemd-rc-local-generator(8)
ConditionFileIsExecutable=/etc/rc.local
After=network.target
[Service]
Type=forking
ExecStart=/etc/rc.local start
TimeoutSec=0
RemainAfterExit=yes
GuessMainPID=no一般正常的启动文件主要分成三部分:
[Unit] 段: 启动顺序与依赖关系
[Service] 段: 启动行为,如何启动,启动类型
[Install] 段: 定义如何安装这个配置文件,即怎样做到开机启动可以看出,/etc/rc.local 的启动顺序是在网络后面,但是显然它少了 Install 段,也就没有定义如何做到开机启动,所以显然这样配置是无效的。 因此我们就需要在后面帮他加上 [Install] 段:
1
2
3
[Install]
WantedBy=multi-user.target
Alias=rc-local.service这里需要注意一下,ubuntu-18.04 默认是没有 /etc/rc.local 这个文件的,需要自己创建
创建/etc/rc.local文件(有的话不用再创建了)
1
touch /etc/rc.local
赋可执行权限
1
chmod 755 /etc/rc.local
编辑rc.local,添加需要开机启动的任务
1
2
3
4
5
6
7
8
9
10
11
12
13
14
15
16
17
18
19
#!/bin/sh -e
#
# rc.local
#
# This script is executed at the end of each multiuser runlevel.
# Make sure that the script will "exit 0" on success or any other
# value on error.
#
# In order to enable or disable this script just change the execution
# bits.
#
# By default this script does nothing.
########################手动添加的命令########################
echo "this is a test" > /usr/local/text.log
sudo vncserver
######################手动添加的命令-end######################
exit 0其中
sudo vncserver就是需要开机启动的任务(注意:sudo写上有益无害,避免不必要的麻烦)echo "this is a test" > /usr/local/text.log是测试开机脚本是否生效用的执行reboot重启系统(查看 /usr/local/text.log 文件是否存在就知道开机脚本是否生效了)
ubuntu
开机启动脚本
先写一个脚本,里面写上执行要执行的命令,再使用update-rc.d 脚本名 defaults命令将改脚本添加到系统启动任务
1 | cd /etc/init.d |
1 |
|
保存后,给脚本添加可执行权限
1 | chmod +x tale |
添加开机启动服务
1 | update-rc.d tale defaults |
有一个需要注意,很多命令的执行需要一个系统的环境,例如上面的java -jar xxx就需要jdk的环境支持,然后很有可能,系统在执行此脚本时,jdk的环境还没有加载进来,所以就需要手动在该脚本中声明需要的环境
修改/etc/rc.local脚本
/etc/rc.local是Linux系统启动后自动执行的一个脚本,默认情况下这个脚本里面没有任务。修改这个脚本可以启动你自己的应用。
修改方式很简单,在最后一行exit 0之前加上开启服务或应用的命令就好了
1 | vim /etc/rc.local |
得到视图如下:
1 | #!/bin/sh -e |
centos/redhat
开机启动脚本
先写一个脚本,里面写上执行要执行的命令,再使用update-rc.d 脚本名 defaults命令将改脚本添加到系统启动任务
1 | cd /etc/init.d |
1 |
|
su -c ‘/etc/init.d/lampp.sh’
保存后,给脚本添加可执行权限
1 | chmod +x lampp.sh |
打开/etc/rc.d/rc.local或/etc/rc.local文件,在末尾增加/etc/init.d/lampp.sh
1 |
|
在centos7(不仅仅)中,/etc/rc.d/rc.local的权限被降低了,所以需要执行如下命令赋予其可执行权限
1 | chmod +x /etc/rc.d/rc.local |
修改/etc/rc.local脚本
/etc/rc.local是Linux系统启动后自动执行的一个脚本,默认情况下这个脚本里面没有任务。修改这个脚本可以启动你自己的应用。
修改方式很简单,在最后加上开启服务或应用的命令就好了
1 | vim /etc/rc.local |
得到视图如下:
1 |
|
可在以上视图中发现有一句# Please note that you must run 'chmod +x /etc/rc.d/rc.local' to ensure中文翻译请注意,您必须运行“chmod +x /etc/rc.d/rc.才能确保成功 - 意思很明显了!
1 | chmod +x /etc/rc.d/rc.local |
Windows
方案一:开机启动文件夹
亲测可用,推荐方案三
我们打开文件夹:
C:\Users(用户)\Administrator(当前用户名)\AppData\Roaming\Microsoft\Windows\Start Menu\Programs(「开始」菜单)\Programs(程序)\Startup(启动 )即可找到启动文件夹。如图: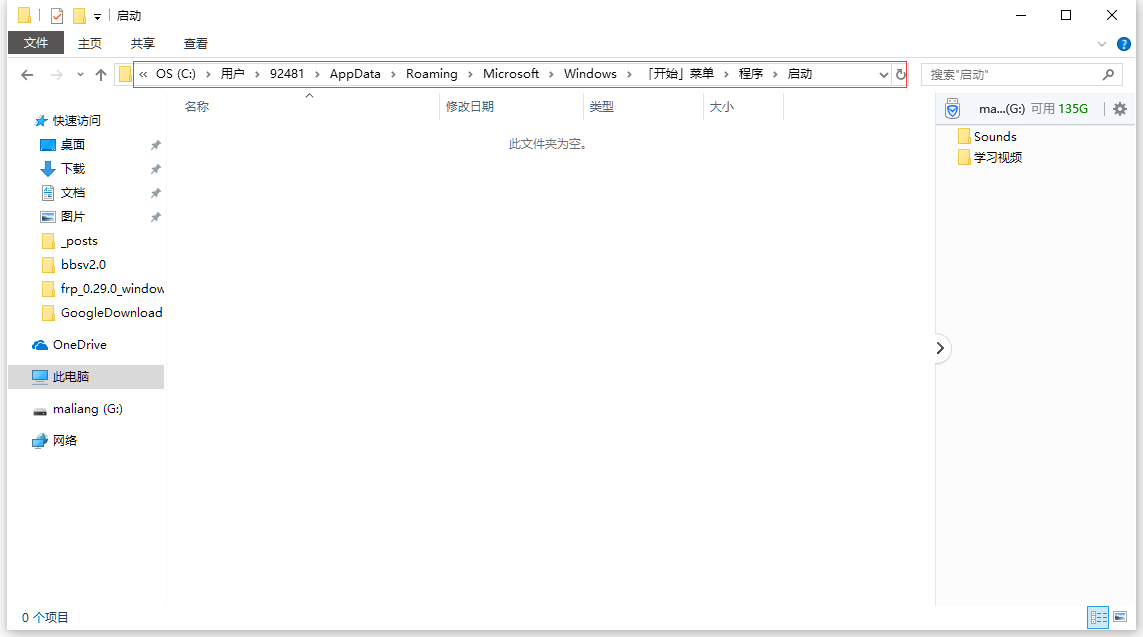
PS:也可以粘贴以下路径回车打开:
%USERPROFILE%\AppData\Roaming\Microsoft\Windows\Start Menu\Programs\Startup新建
frpc.bat脚本,内容如下:1
2
3e:
cd E:\Program Files\frp_0.29.0_windows_amd64
frpc -c frpc.ini
新建
frpc.bat快捷方式然后我们把
frpc.bat的快捷方式,Win10开机后就可以自动运行了。如图: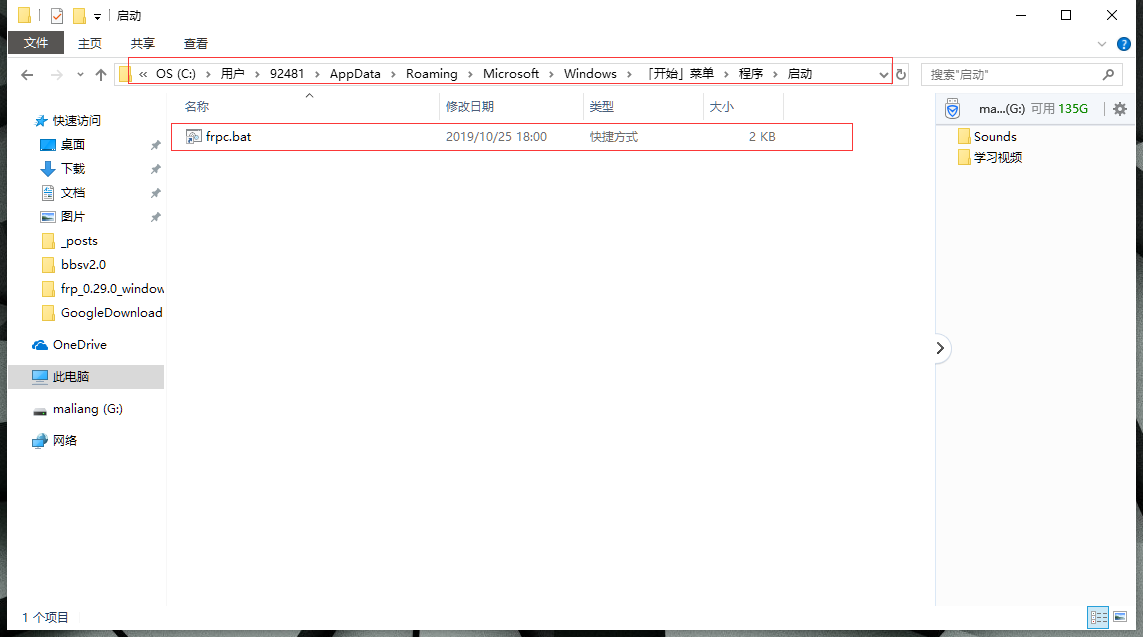
方案二:任务计划程序
未亲测,推荐方案三
在我的
电脑->右键->管理创建基本任务
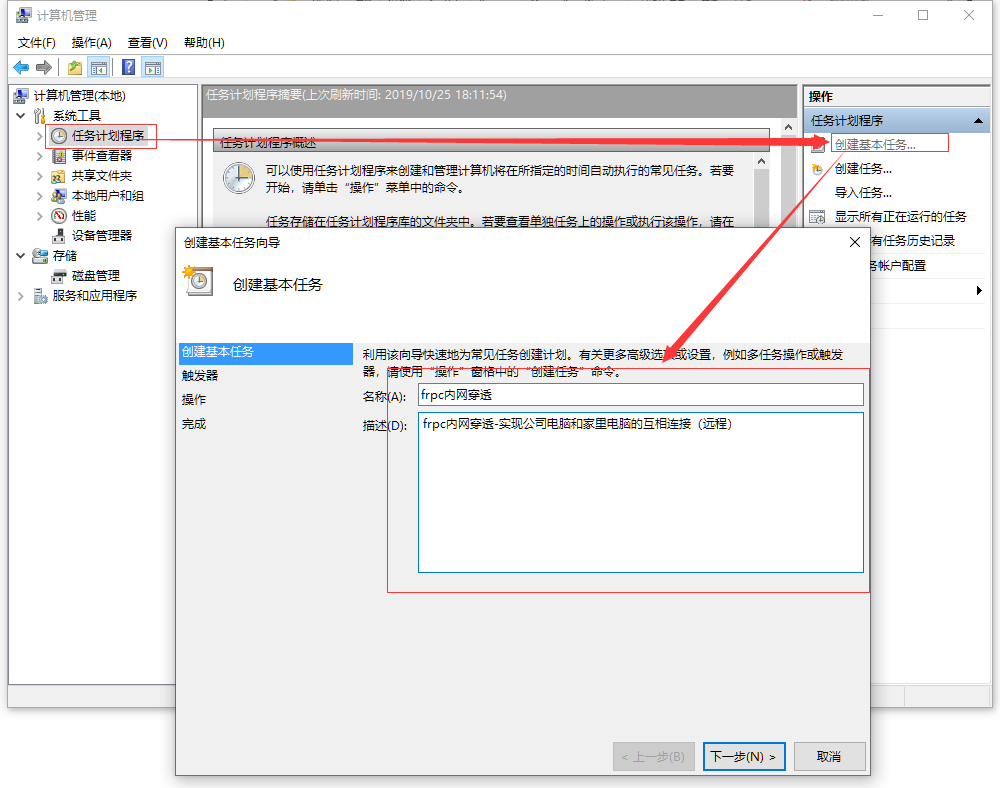
下一步
下一步
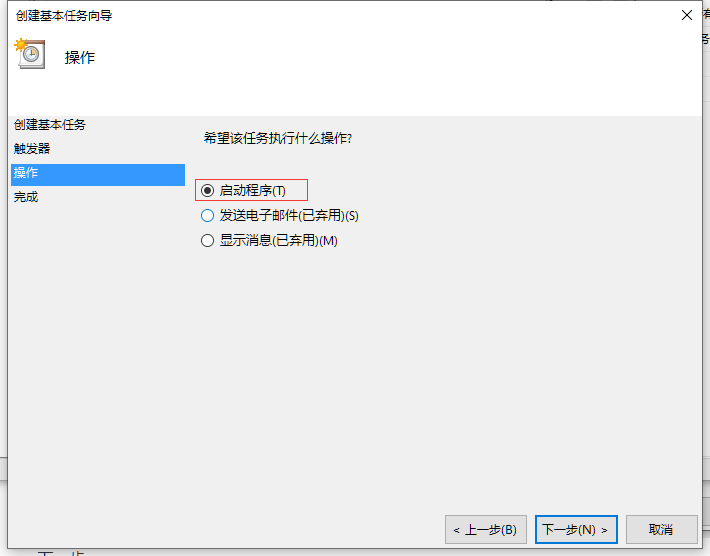
下一步,
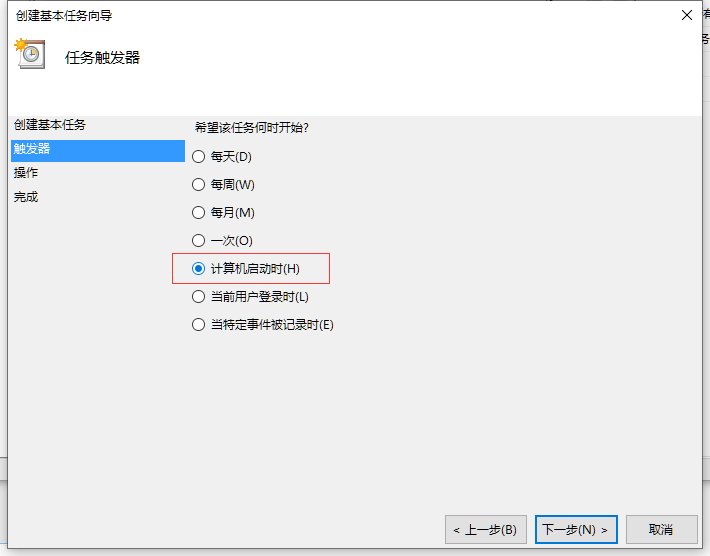
选择开机启动脚本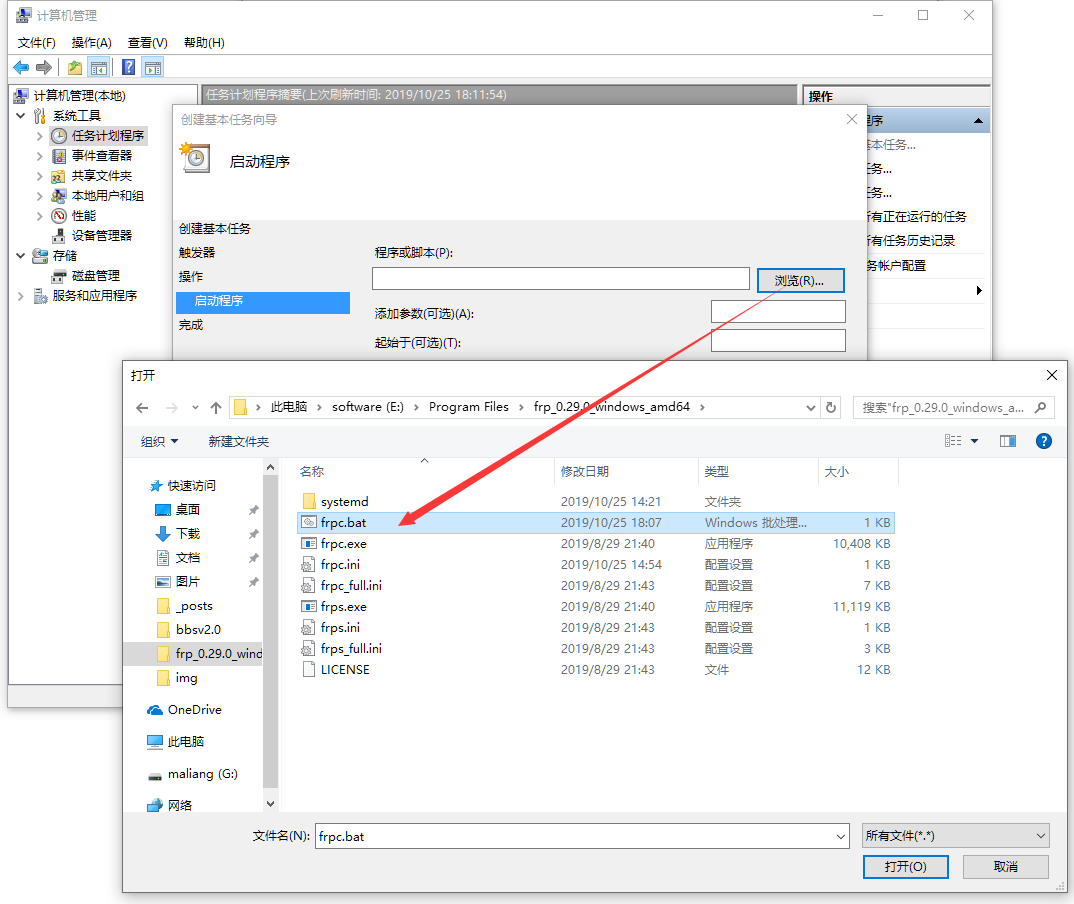
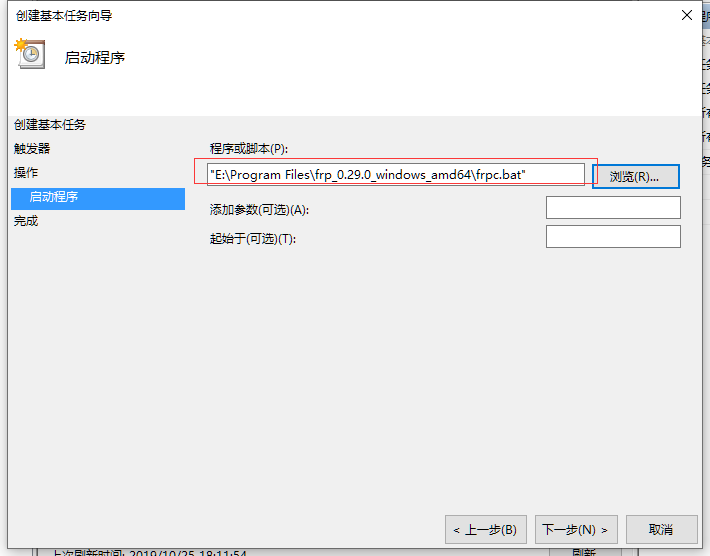
下一步
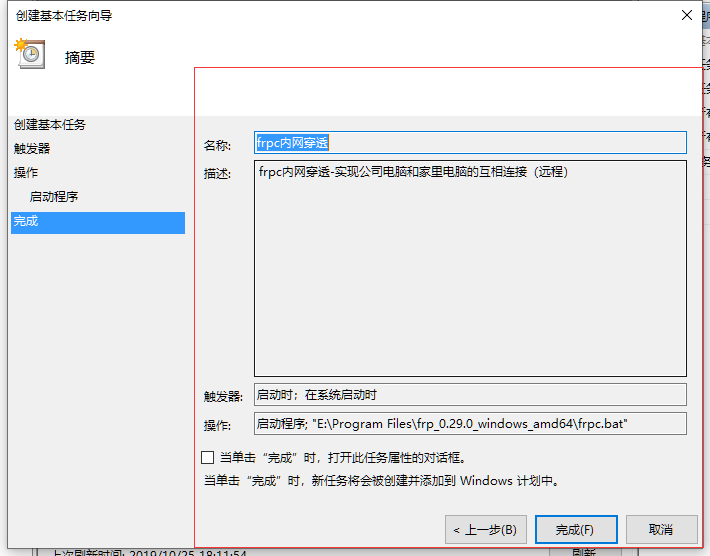
完成。
然后就完成啦,可以试试,开机的时候,会不会自启动。
方案三:nssm
用nssm将frpc注册为Windows系统服务
注:怎么删除Windows服务
1 | sc delete [服务名] |
亲测可用,推荐优先使用该方案
下载nssm

解压至本地目录
根据操作系统选择32位或64位nssm,cd到nssm所在目录
我的系统是64位的:
服务注册(以注册frpc为例)
命令行输入:
1
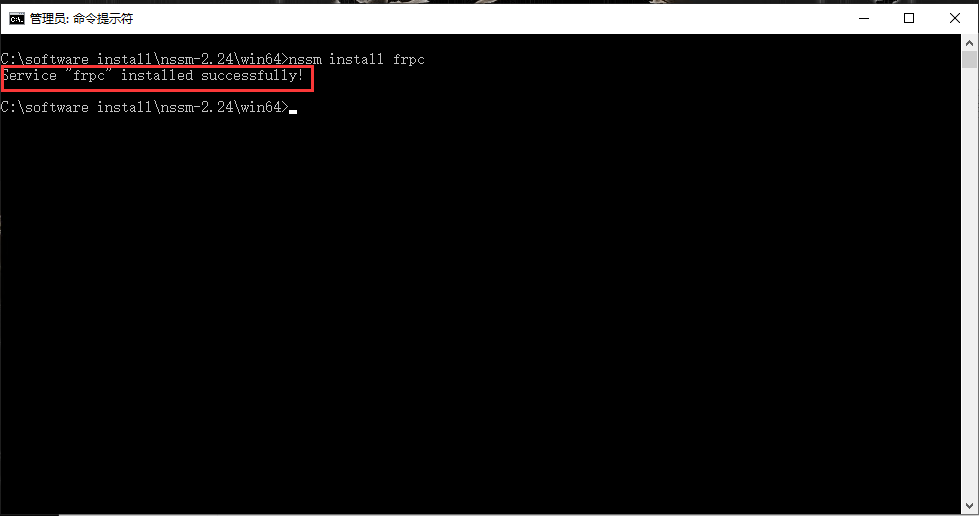
nssm install frpc # 回车
问题:
此时可能会抛出
Administrator access is needed to install a service.意思是:需要管理员权限才能安装服务当我检查用户帐户时,它表明我是“管理员”组中的用户名。难搞哦!
解决
右键单击cmd快捷方式,以管理员身份运行
亲测可用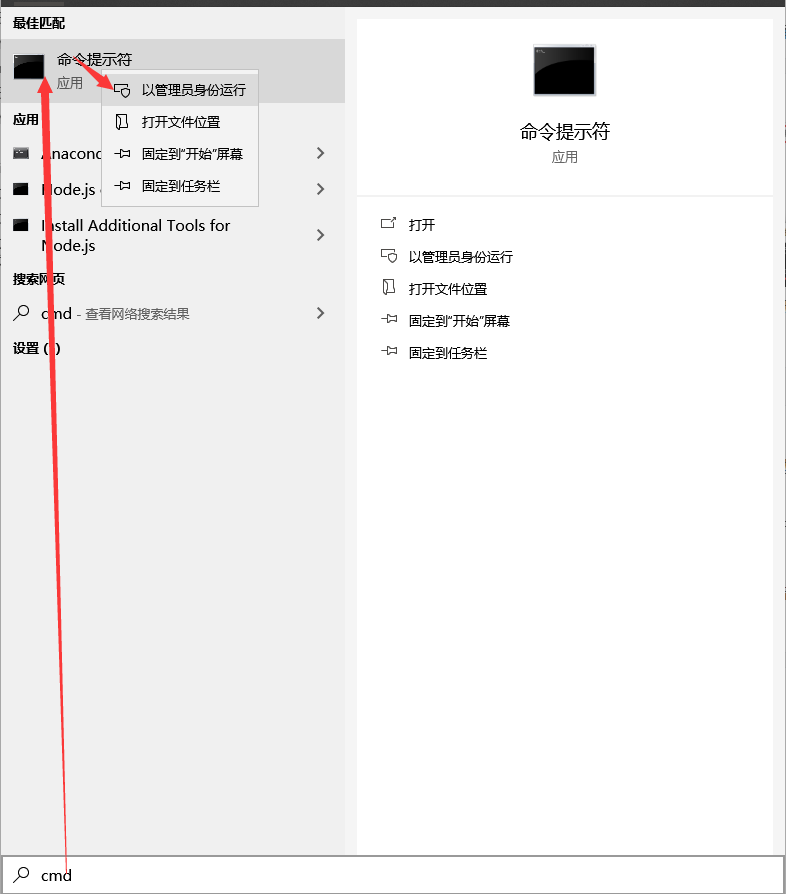
打开命令窗口后重新执行
nssm install frpc命令执行
cmd / admin未亲测打开命令窗口后重新执行
nssm install frpc命令
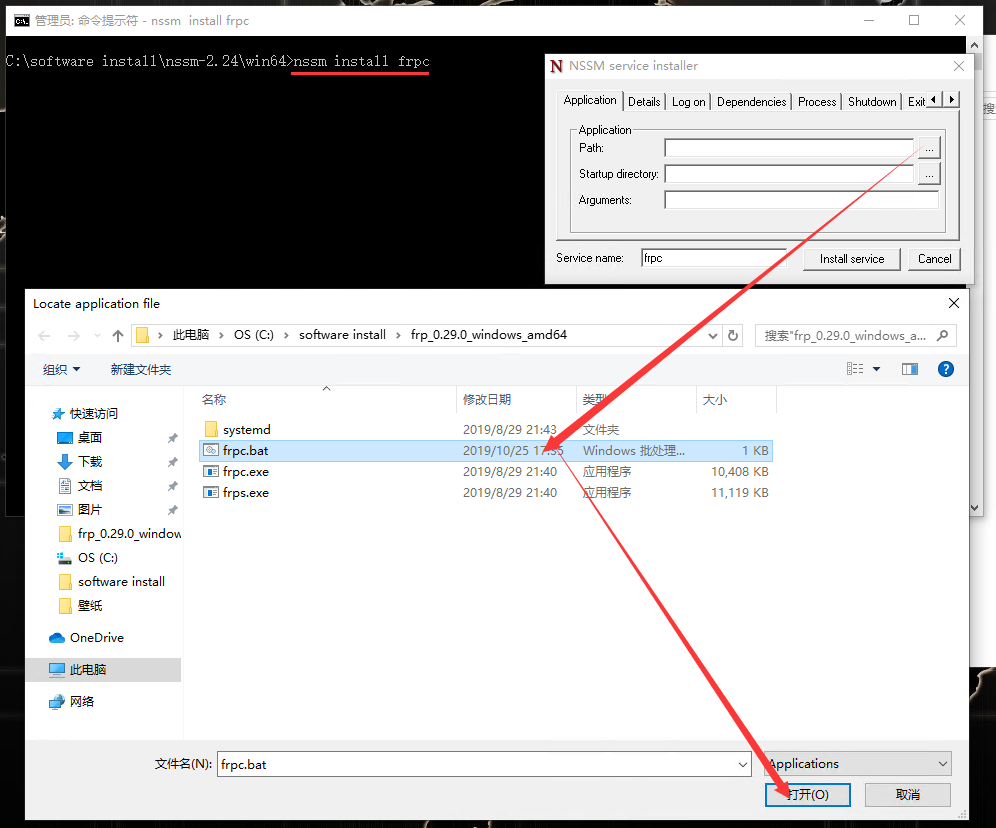
接下来会弹出一个框,在path处选择启动frpc的frpc.bat,点击Install service即可

服务启动
1
2
3
4
5
6
7
8
9nssm start frpc
# 其他命令:
nssm start <servicename>
nssm stop <servicename>
nssm restart <servicename>
nssm status <servicename>
nssm rotate <servicename>
nssm remove <servicename>
...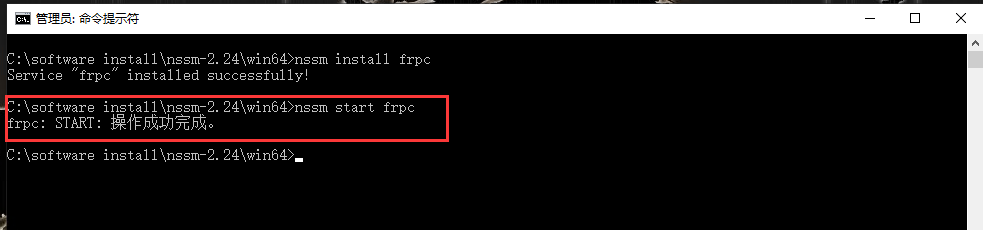
启动后,你将在本地计算机服务列表看到frpc服务。Win+R,
services.msc
做成服务
把tomcat做成服务
修改 tomcat 的catalina.sh 文件,增加 tomcat.pid 的配置
1
2
3
4
5
6vi /home/nanshengbbs/tomcat9/bin/catalina.sh
[ -z "$CATALINA_BASE" ] && CATALINA_BASE="$CATALINA_HOME"
# 增加 tomcat.pid 的配置
CATALINA_PID="$CATALINA_BASE/tomcat.pid"
# Ensure that any user defined CLASSPATH variables are not used on startup,创建一个系统初始化文件
创建一个系统初始化文件
tomcat以便 start、restart、stop等1
vi /etc/systemd/system/tomcat.service
复制下面的内容
1
2
3
4
5
6
7
8
9
10
11
12
13
14
15
16[Unit]
Description=tomcat
# 指定启动的时机
After=network.target
[Service]
Type=forking
# 自己jdk安装位置
Environment=JAVA_HOME=/usr/lib/jvm/jdk1.8.0_221
ExecStart=/home/nanshengbbs/tomcat9/bin/startup.sh
ExecStop=/home/nanshengbbs/tomcat9/bin/shutdown.sh
ExecReload=/bin/kill -s HUP $MAINPID
PrivateTmp=true
[Install]
WantedBy=multi-user.target设置 tomcat.service 的执行权限
1
chmod +x /etc/systemd/system/tomcat.service
启动
1
2
3
4
5
6
7
8
9
10
11
12
13
14
15
16
17
18
19
20
21
22# 置为开启机启动
systemctl enable tomcat
# 启动服务
systemctl start tomcat
# 停止服务
systemctl stop tomcat
# 重启服务
systemctl restart tomcat
# 检查状态
systemctl status tomcat
# 移除服务
systemctl kill tomcat
# 在开机时禁用服务
systemctl disable tomcat
# 查看服务是否开机启动
systemctl is-enabled tomcat
# 查看已启动的服务列表
systemctl list-unit-files|grep enabled
# 查看启动失败的服务列表
systemctl --failed
# 查看所有状态的服务列表
systemctl list-units --type=service